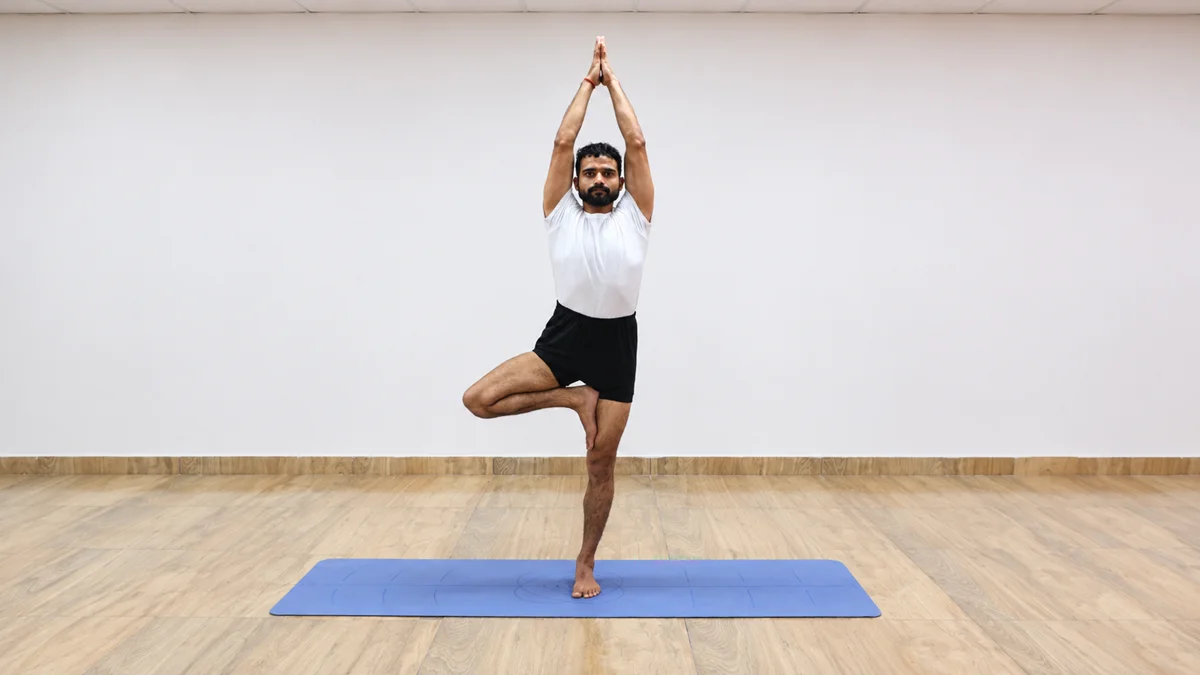
You lift one foot and look at a spot on the wall. Within three breaths, your standing ankle starts to shake. Your lifted hip creeps up, your ribs push forward, and you step out of the pose. If this sounds like you, the problem is usually not a weak ankle. This guide shows you how to balance in Tree Pose (Vrksasana) by fixing the pose from the ground up, so the wobble has less room to start.
Why do my ankles wobble in tree pose?
Your ankle wobbles because it is fixing mistakes that the rest of your body is not handling. When your hips tilt, your foot sits unevenly, or your eyes keep moving, the ankle has to work extra hard, and it starts to shake.
Standing on one leg is challenging, even for experienced practitioners. Your body makes small adjustments around the ankle, knee, hip, and trunk to help you stay balanced. A little movement is normal. If you feel increasingly unsteady, use support or come out of the pose.
Balance depends on several parts of the body working together. Hip position, knee control, foot contact, vision, and attention can all affect how steady you feel. Gripping the floor harder is not always helpful; aim for a comfortable, stable foot and use a wall or chair when needed.
What should I do before I start tree pose?
Spend two to three minutes warming up your ankles, hips and feet. Tree Pose asks one ankle to hold you steady while the other hip turns outward. If you start cold, both jobs feel harder.
Here is a short warm-up:
- Ankle circles: Lift one foot and draw slow circles with your toes. Do five in each direction, then switch feet.
- Toe and heel rocks: Stand tall. Rock onto your toes, then onto your heels. Do this ten times. It wakes up the muscles in your shin and calf.
- Hip mobility: Do a few rounds of cat-cow on your hands and knees to move the spine gently. Then lie on your back and do a gentle figure-four stretch. Stay for five slow breaths on each side.
- Mountain pose: Stand with your feet hip-width apart and take five steady breaths before you pick a side.
None of this needs to be hard. The goal is to start the pose with warm joints and a calm breath.
How do I set up my standing leg from the ground up?
Build the pose in order, from your foot to your neck. Each part sets up the part above it, so a small mistake at the foot can turn into a wobble at the hip. This is the core of how to balance in Tree Pose (Vrksasana).
Foot. Picture a tripod under your foot. The three points are the base of the big toe, the base of the little toe, and the center of the heel. Press all three down evenly. Keep your toes long and relaxed, not curled. If your arch drops inward or the outer edge of your foot lifts, bring your weight back to the tripod.
Knee. Keep the standing knee active without pushing it backward or locking it. Let it remain naturally straight, with a slight softness if that helps you balance. Point the kneecap generally in the same direction as the toes.
Hips. Imagine two headlights on the front of your hip bones. Point them straight ahead. Press your standing leg firmly into the floor. Keep the standing hip right under your body, not pushed out to the side. This one change helps many people.
Spine and ribs. Grow tall from your tailbone to the top of your head. Gently draw the lower front ribs down so they do not poke forward. Think of getting taller, not leaning back.
Shoulders and Neck. Let your shoulder blades slide down your back. Keep your chin level and the back of your neck long.
Gaze. Pick one still spot at eye level or a little lower. Keeping your eyes on it can give your balance system a steady visual reference. If you are new to the pose, keep your eyes open and use a wall or chair for support.
Where should I put my lifted foot?
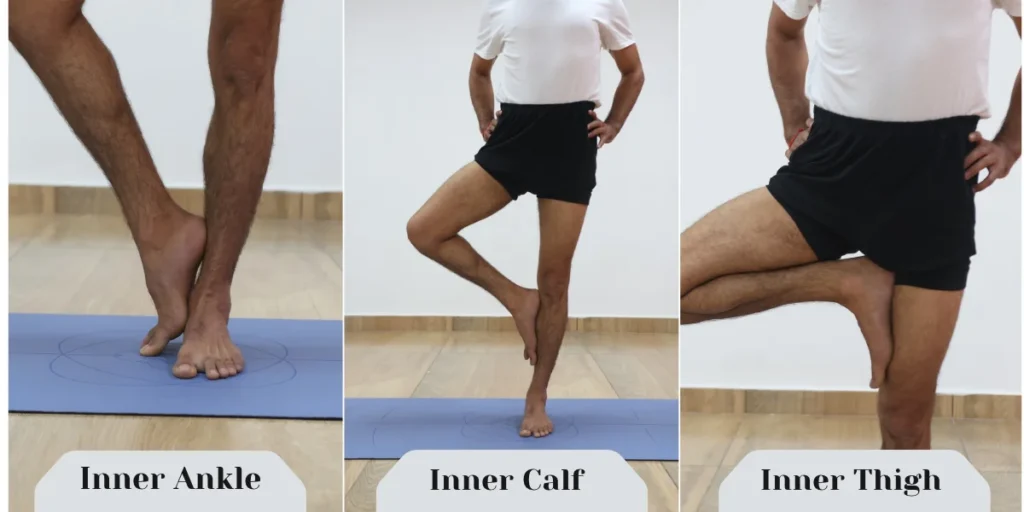
Place the foot on your inner ankle, inner calf, or inner thigh above the knee. Do not press it against the knee joint. Choose a position that allows the standing knee and hip to remain comfortable and well aligned.
The right spot depends on your hips. If your hip turns out easily, the inner thigh may work. If that spot makes your hips tilt or your standing hip push out, bring the foot lower. A low foot with level hips is a better tree pose than a high foot with a hiked hip.
Avoid pressing the lifted foot directly against the side of the standing knee. Choose the ankle, calf, or inner thigh instead, and use support if needed. If any position causes discomfort, lower the foot or come out of the pose.
Whichever spot you pick, press your foot and your leg toward each other with equal effort. If your foot just rests on your leg, the pose has nothing to push against and it loses its shape.
Why does my standing leg burn or shake in tree pose?
Your standing leg works hard in this pose. The main workers are the muscles on the outside of your hip, the muscles on the front of your thigh, and the muscles around your ankle. That effort feels like warmth, burning or trembling.
The muscle on the side of your standing hip is called the gluteus medius. It helps keep your pelvis steady when the other foot leaves the floor. As it tires, the opposite hip may drop or the standing hip may drift out. You may then lift the hip on the other side to compensate. This is one form of hip hiking in tree pose. Around the ankle, the shin and calf muscles make small adjustments that help you balance.
A small 2012 study in Evidence-Based Complementary and Alternative Medicine examined different versions of tree pose in 20 healthy older adults. The researchers reported no significant difference in hip and knee joint loading between the versions they tested. The study was small and involved a specific group, so its findings should not be generalised to everyone. It does, however, remind us that balance and muscular control are important parts of the pose.
A little shaking is not a warning sign. A gentle tremble in the leg usually means the muscles are working. Sharp pain, a pinch in the knee, or a feeling that the joint might give way is different. If you feel any of these, come out of the pose.
How can props make tree pose steadier?
Props help you feel the right alignment, so you can learn how to balance in Tree Pose (Vrksasana) without struggling for every second. Using a wall, block or chair does not make the pose “less than”. In the Iyengar style of yoga, props help your bones stack up and your muscles work in the right places.
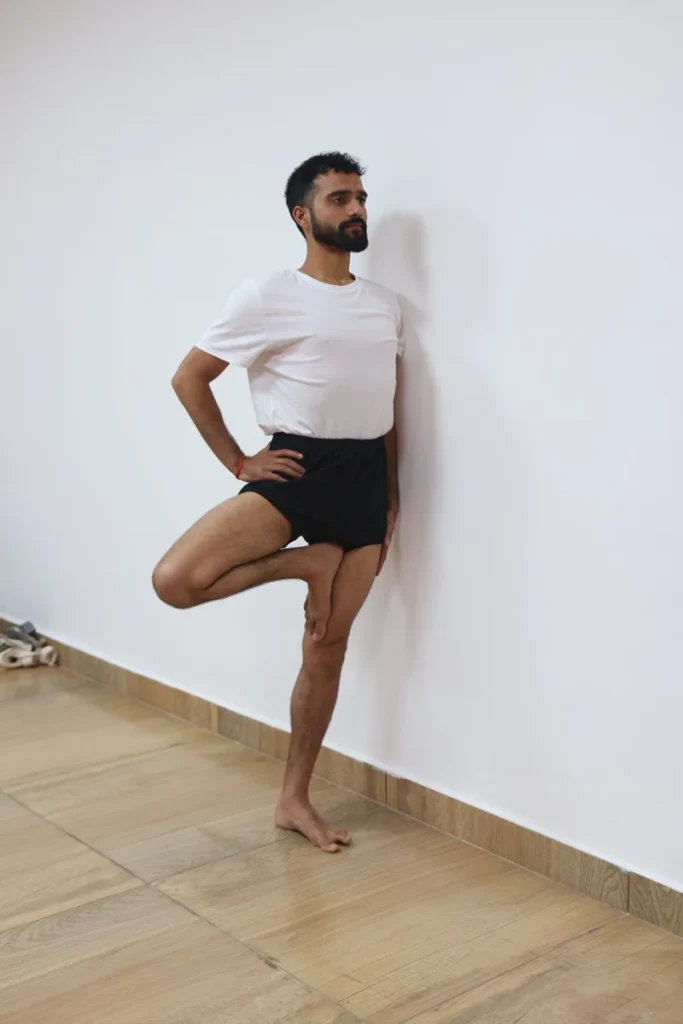
Option 1: Wall beside your standing leg. Stand with the hip and shoulder of your standing side a few centimeters from a wall. If your standing hip starts to drift out, it will touch the wall. You will feel it right away, without looking down. As you get better, move a little further from the wall.
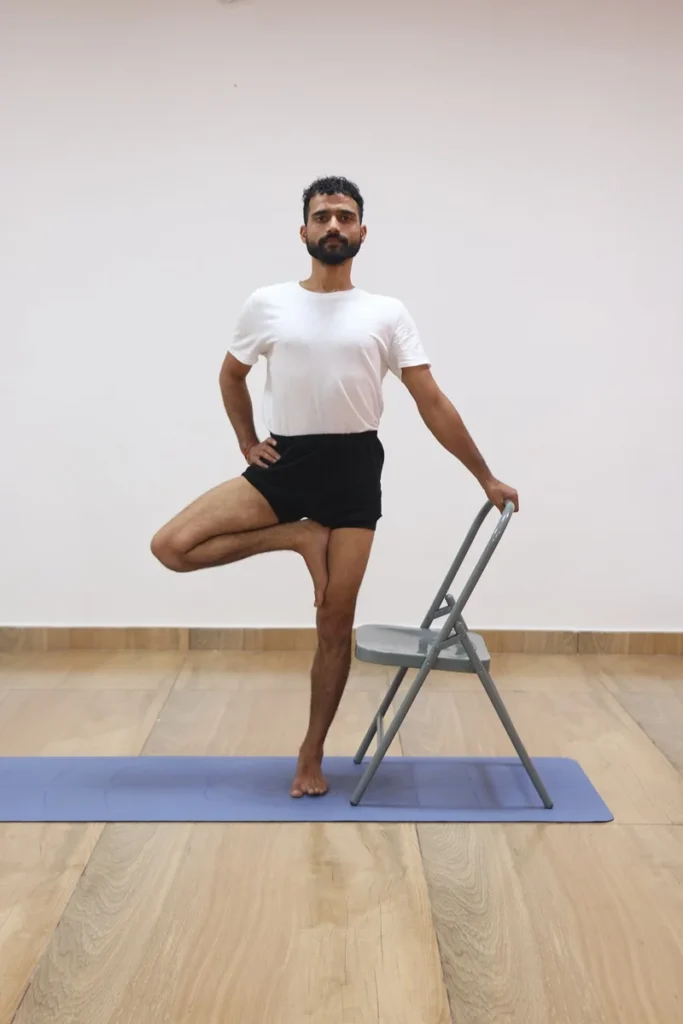
Option 2: One hand on a wall or chair. Rest your fingertips lightly on a wall or the back of a chair. Think of it as a guide, not something to hold. It gives your brain extra information about where you are in space. Many people need it less after a few weeks.
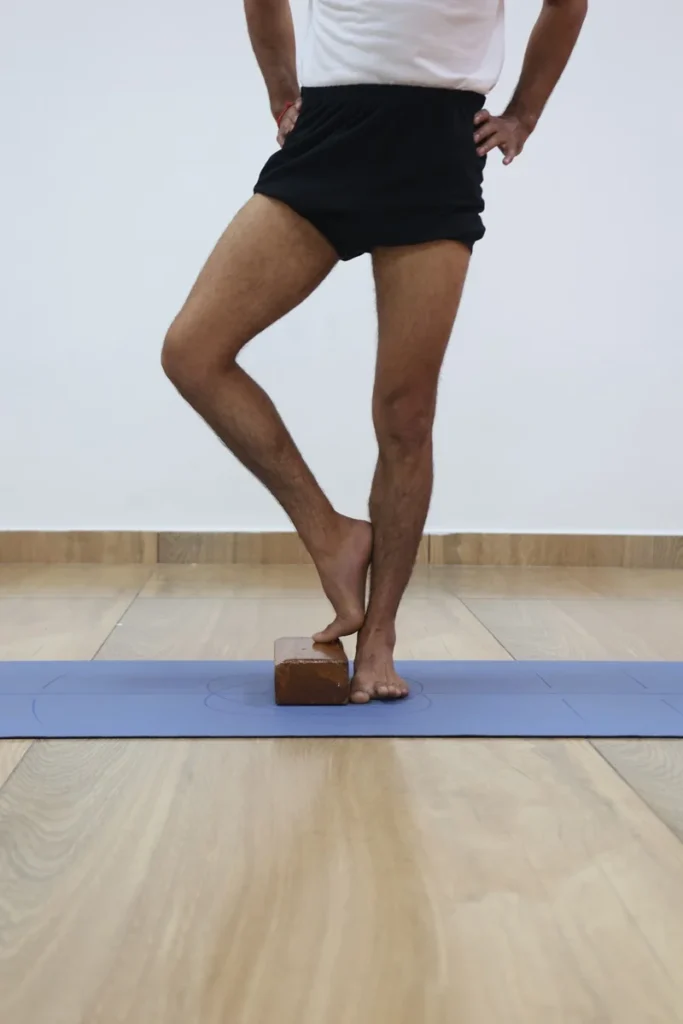
Option 3: Block for the lifted foot. Put a yoga block on the floor next to your standing foot. Rest the toes of your lifted foot on it, with the heel up and the knee turned out. This is called the “kickstand” position. It lets you work on your hips, ribs and standing leg with a safety net. When it feels steady, move the foot up to your ankle or calf.
Hands. Press your palms together at your chest in Anjali Mudra. This keeps your arms from adding to the balance challenge, and the pressure of your palms helps you feel the middle of your body. Raise your arms overhead later, when your legs and hips feel steady.
What are the common tree pose mistakes, and what do they do to my body?
The common mistakes are hiking the hip, flaring the ribs, locking the standing knee, pressing the foot on the knee, and letting your eyes wander. Each one changes how weight moves through your body. Each also has a simple fix.
- Hiking the lifted hip. The hip on the lifted side may rise toward the ribs while the standing hip shifts outward. This can make the waist and pelvis uneven and may affect how the lower back and standing leg bear the load. To adjust, press the standing foot down, bring the standing hip back toward the centre, and lower the lifted foot if needed.
- Flaring the ribs. When you raise your arms overhead, your ribs often tip forward and your lower back arches. Over time this can squeeze the lower spine. Draw your lower ribs down and keep your hands at your chest until you feel steady.
- Locking the standing knee. Pushing the knee backward beyond its natural straight position can place unnecessary stress on the joint. Keep the leg active without forcing the knee back.
- Foot against the knee. Pressing the lifted foot against the standing knee may feel uncomfortable or create unwanted pressure. Place the foot above or below the joint, on the inner thigh or calf, and choose the position that feels stable. Avoid pressing directly into the knee.
- Wandering eyes. Looking around the room, down at your foot, or up at the ceiling can make balancing more difficult. Choose one still spot and keep your gaze there.
- Arms before legs. Reaching up before your legs are steady raises your center of weight and makes the wobble bigger. Add the arms last.
How long should I hold tree pose, and how do I get better?
When you practice how to balance in Tree Pose (Vrksasana), start with three to five slow breaths on each side. Then build up to eight or ten as you get steadier. A short hold with good alignment teaches you more than a long hold with collapsing hips.
Here is a simple four-week plan:
- Week one: Use the wall beside your standing leg. Keep the lifted foot on your ankle or on a block. Hold three breaths on each side.
- Week two: Move the foot up to your inner calf. Use one fingertip on the wall, or no wall if your hips stay level.
- Week three: Bring your palms to your chest and hold five breaths without touching the wall.
- Week four and after: Try the inner thigh if your hips stay level. Raise your arms overhead last, keeping your ribs down.
Your breath matters too. Breathe slowly and evenly through your nose. If your breath gets short or you hold it, the pose is too hard for you today. Make it easier instead of pushing through.
Practice both sides. Most people have one side that is steadier, and that is normal. Spend an extra breath or two on the weaker side.
Who should be careful with tree pose?
If you have a knee, ankle, or hip injury, dizziness, or a balance condition, ask a healthcare professional or suitably qualified teacher how to adapt the pose. Practice near a wall or chair. During pregnancy, use support and avoid forcing the hip into a deep turn.
If you have recently sprained your ankle or have an inner-ear or balance condition, keep your eyes open and practise with support. If you have had knee surgery or ongoing knee pain, ask your treating professional which foot positions are appropriate. If raising your arms is uncomfortable or you have been advised to limit overhead movement, keep your hands at your heart. When in doubt, seek individual guidance rather than relying on general instructions.
What is a five-point checklist for balancing in tree pose?
To balance in Tree Pose (Vrksasana) with less effort, check five things in this order: foot, knee, hips, ribs and gaze. If you fix them in this order, most of the wobble settles on its own. Keep this list near your mat.
- Foot: Your standing foot is pressed down on its tripod, with the toes long and relaxed.
- Knee: Your standing knee is soft and points in line with your second toe.
- Hips: Both hip bones face forward, and the standing hip sits under your body, not pushed out.
- Ribs: Your lower ribs are drawn in, your spine is long, and your hands stay at your chest until you feel steady.
- Gaze: Your eyes rest on one still spot, and your lifted foot presses into your leg, not into your knee.
Can I check my tree pose on my own at home?
You can learn a lot by practising at home, but it is hard to see your own hips, ribs and knees. A mirror shows part of the picture. A teacher who watches you live can see the rest.
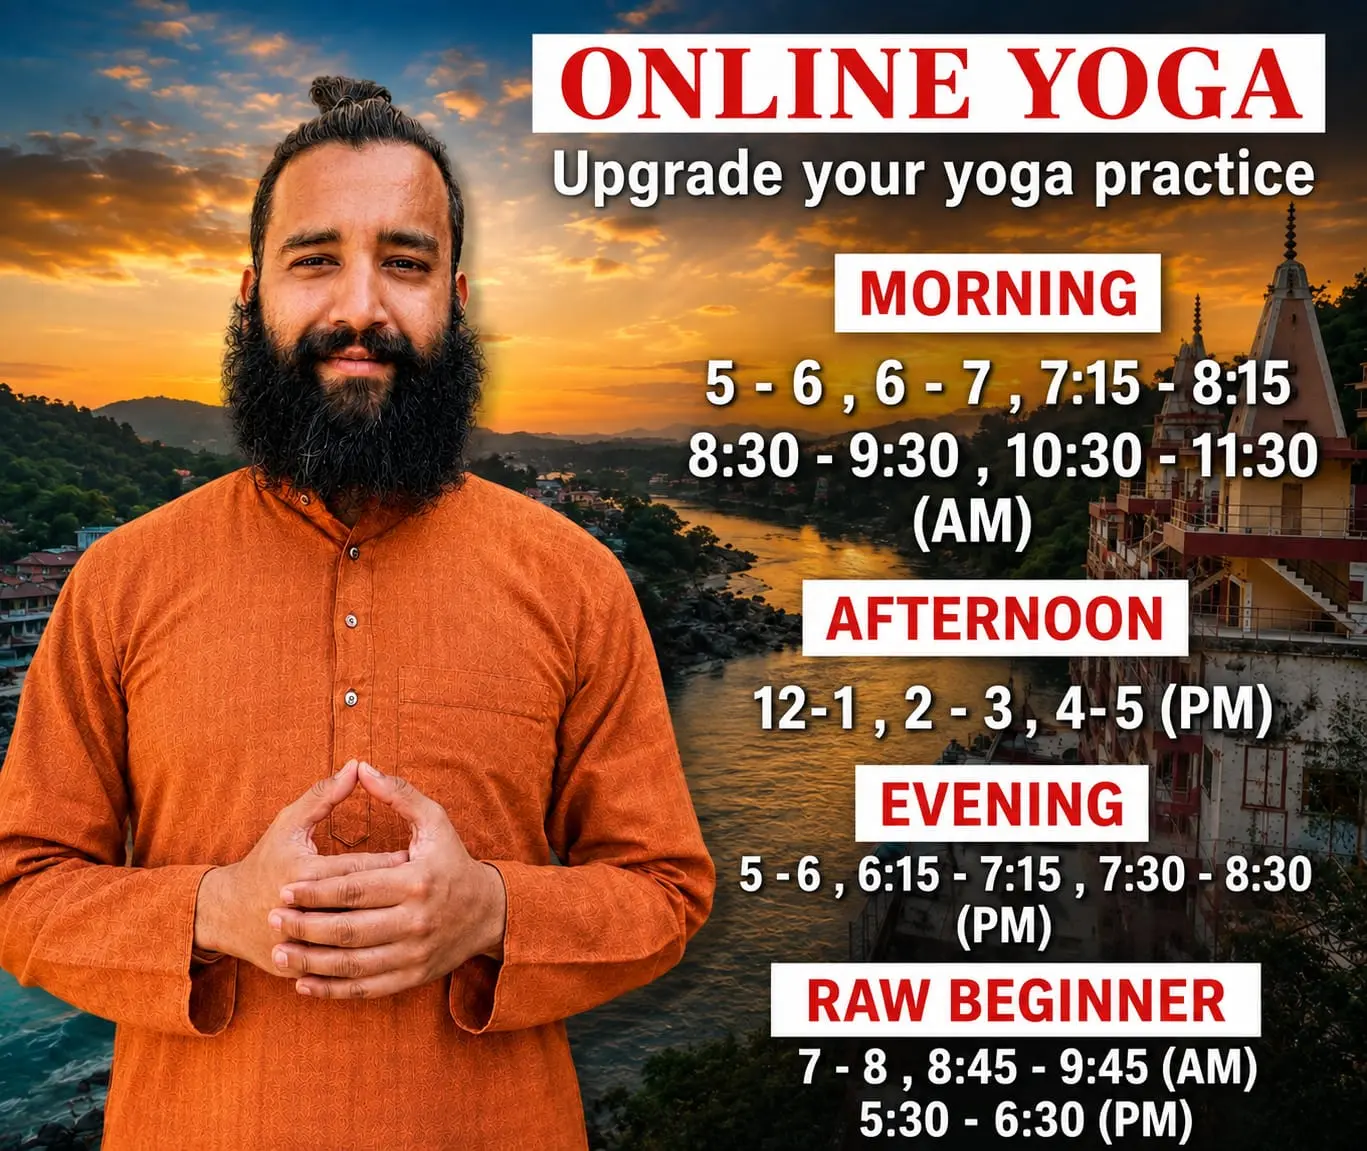
The problems in this guide, such as a hiking hip, flared ribs, or a knee pushed sideways, can be easier to notice from outside than to feel from inside. A recorded video cannot respond to what your body is doing. In live online yoga classes, a teacher who can see you on camera may offer spoken cues, such as “bring your standing hip back” or “lower your foot below the knee.” At Ganga Yogshala, teachers observe students on camera and provide guidance during class. A free trial class is available for anyone who wants to experience the format.
If you want to keep practising alone for now, record a short video of yourself from the front and from the side. Then compare it with the five-point checklist above.