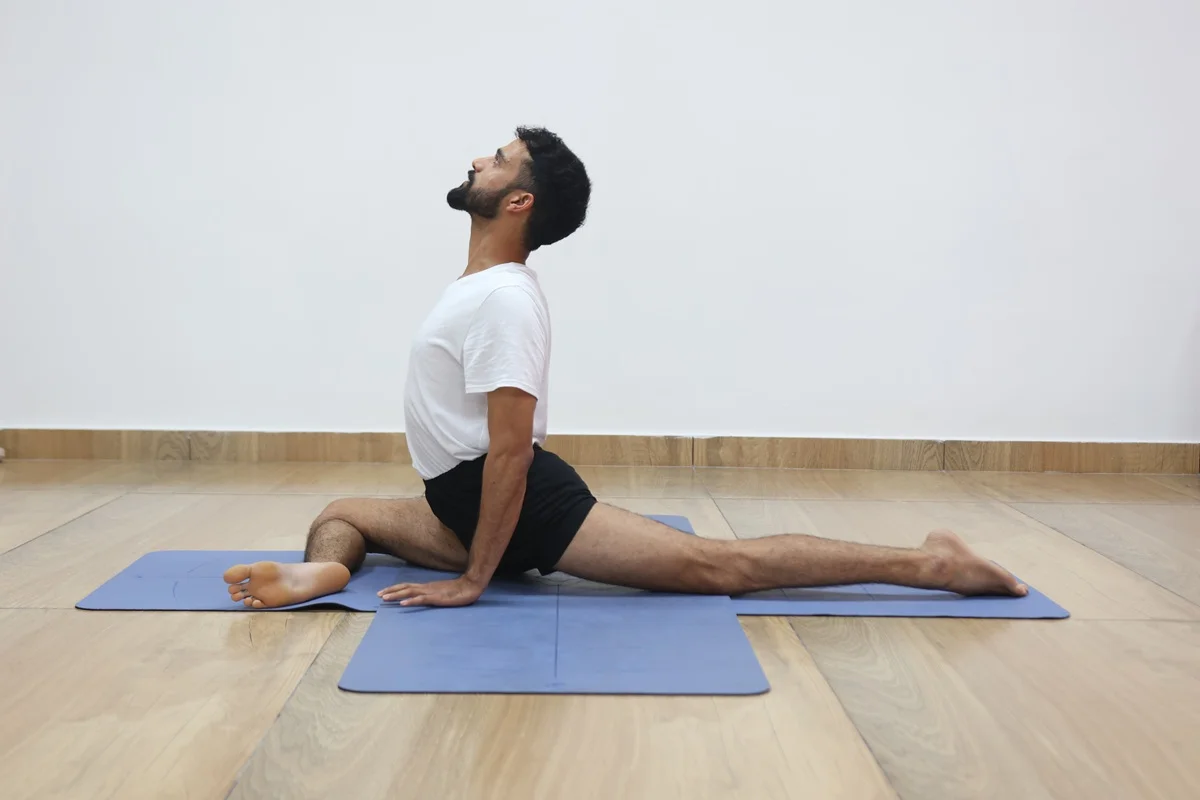
You fold into Pigeon Pose hoping to feel a stretch in your hip. Instead, you may feel a sharp pull around the knee or an ache near the back of the pelvis. These sensations can have different causes, and they do not mean your body is “too stiff” for yoga. One possible contributor is asking the hip and knee to move beyond a comfortable range. This guide explains ways to modify the pose with simple props and when to seek individual advice.
Why does Pigeon Pose hurt my knee or SI-joint?
Discomfort in Pigeon Pose can occur when the hip does not rotate comfortably and the position places too much stress on the knee. Some people also feel discomfort around the back of the pelvis. The causes vary, so do not assume that all knee or SI-region pain comes from one alignment mistake.
In Pigeon Pose, the front thigh rotates outward from the hip. The knee is designed mainly for bending and straightening, and it tolerates rotation only within limits. If you force the shin toward the front edge of the mat when your hip does not comfortably allow that position, the knee may be stressed. Do not push through knee pain to reach a particular shin angle.
The sacroiliac (SI) joints are where the sacrum meets the pelvis. Discomfort around this area can have several causes, and it is not possible to tell from the pose alone whether the SI-joint itself is responsible. An uneven or unsupported position may feel uncomfortable, but it is too simplistic to describe one side as being pulled and the other squeezed.
A block or folded blanket under the front hip may make the position more comfortable by providing support and reducing the need to hold the pelvis unevenly. It does not treat every cause of SI-region pain, and it cannot guarantee that the knee is protected.
How can I tell if the problem is my hip, my knee, or my SI-joint?
A deep, broad stretch in the buttock may be acceptable if it remains comfortable. Sharp, pinching, burning, or joint pain is a reason to come out of the pose and reassess. Sensations alone cannot reliably identify which structure is responsible.
Use this quick guide next time you practice:
- Stretch in the buttock or outer hip of the front leg: This may be the intended stretch. Stay only if it is comfortable, steady, and does not increase as you hold the pose.
- Pulling or pinching around the front knee: Come out of the pose. Try a smaller range, a different shin angle, or a supported alternative. Do not assume the hip is the only cause.
- Discomfort on the outside of the front knee: Change the leg position or choose a different variation. Flexing the foot may help some practitioners feel more active around the ankle, but it does not guarantee knee protection.
- Ache near the back of the pelvis: Stop and adjust the support or choose another pose. The location alone cannot confirm that the SI-joint is the source.
- Sharp discomfort at the front of the back-leg hip or in the low back: Shorten the stance, add support, or leave the pose if the discomfort remains.
- Tingling or shooting pain down the leg: Stop the pose and seek advice from a healthcare professional, particularly if the symptoms persist or recur.
Pay attention to how you feel during practice and afterwards. If knee or pelvic-area discomfort persists into the next day, reduce or pause the pose and consider seeking professional advice.
How should I warm up before Pigeon Pose?
Warm up with a few gentle movements for the hips, knees, and lower back before trying Pigeon Pose. A warm-up may help you move more comfortably, but it does not guarantee that the pose will be suitable for your body.
Try this simple order, about five minutes in total:
- Cat and cow, 8 slow rounds. This wakes up the spine and the pelvis.
- Hip circles on hands and knees, 5 each way. Draw big, slow circles with one knee to loosen the hip socket.
- Low lunge with the back knee on a folded blanket, 5 breaths per side. This opens the hip flexors of the back leg, which matter a lot in pigeon.
- Supine figure four, 8 breaths per side. Lie on your back, cross one ankle over the opposite knee, and gently draw the legs toward your chest. This lets you feel the hip turn outward with no weight on the knee.
- Bridge pose, 5 slow lifts. This gently activates the glutes that support the pelvis.
If the figure-four position feels uncomfortable, do not use it as a test of how much your hip can turn. Choose a smaller range or another comfortable warm-up instead.
How do I do Pigeon Pose step by step without stressing the knee?
Build the pose gradually, one step at a time. The knee should remain comfortable throughout. If it does not, stop and choose a supported alternative rather than trying to adjust through the pain.
1. Start on hands and knees. Stack your wrists under your shoulders and your knees under your hips.
2. Slide one knee forward. Bring the right knee toward your right wrist. Place the right shin on the floor at an angle that feels comfortable; do not force it to be parallel to the front edge of the mat. For many people, the foot will sit closer to the opposite hip. The right angle varies from person to person.
3. Position the front foot comfortably. Some teachers cue a gently active or flexed foot, but this does not guarantee that the knee is protected. If the knee feels strained, come out and change the position or choose another variation.
4. Slide the back leg straight behind you. Keep the top of the back thigh pointing down to the floor and the toes untucked or tucked, whichever feels better on the ankle.
5. Support the pelvis. Notice whether one side of the pelvis is much higher or unsupported. Place a block or folded blanket under the front hip if it helps you rest more evenly. Do not force the pelvis to a particular height or angle.
6. Lengthen the spine. Press your fingertips into the floor, lift your chest, and stay upright. You do not need to fold forward. Folding is an extra step and should only happen if the knee and pelvis stay quiet.
7. Stay for a few comfortable breaths, then press into your hands and return slowly to hands and knees. If the knee feels uncomfortable at any point, stop and change the variation.
For more on how the front knee should track in other poses, the Warrior 2 guide explains the same knee and toe line in a standing pose.
Why do my hips and glutes burn in Pigeon Pose?
A mild stretch or muscular effort around the hip and buttock may occur in Pigeon Pose. It should remain comfortable and should not feel like pinching or pressure inside a joint.
The front-leg position can stretch muscles around the hip and buttock, while the back-leg position may lengthen the hip flexors. The amount of stretch varies with each person’s anatomy and setup. Do not assume that a particular sensation means one specific muscle is tight.
Your inner thigh muscles also work to stop you from sinking too far. If you feel a quivering effort there, that is fine. It means you are holding the pelvis up instead of dropping into the joints.
A useful but imperfect guide is that a broad, mild muscular stretch may be more comfortable than a sharp or localised joint sensation. However, sensation alone cannot reliably distinguish muscle, tendon, nerve, or joint problems. Stop if you feel sharp pain, numbness, tingling, or worsening discomfort.
Which props make Pigeon Pose safer?
A block or folded blanket under the front hip may provide support and make Pigeon Pose more comfortable. It can help reduce the need to hold the pelvis unsupported, but it does not remove all load from the knee or treat every cause of SI-region pain.
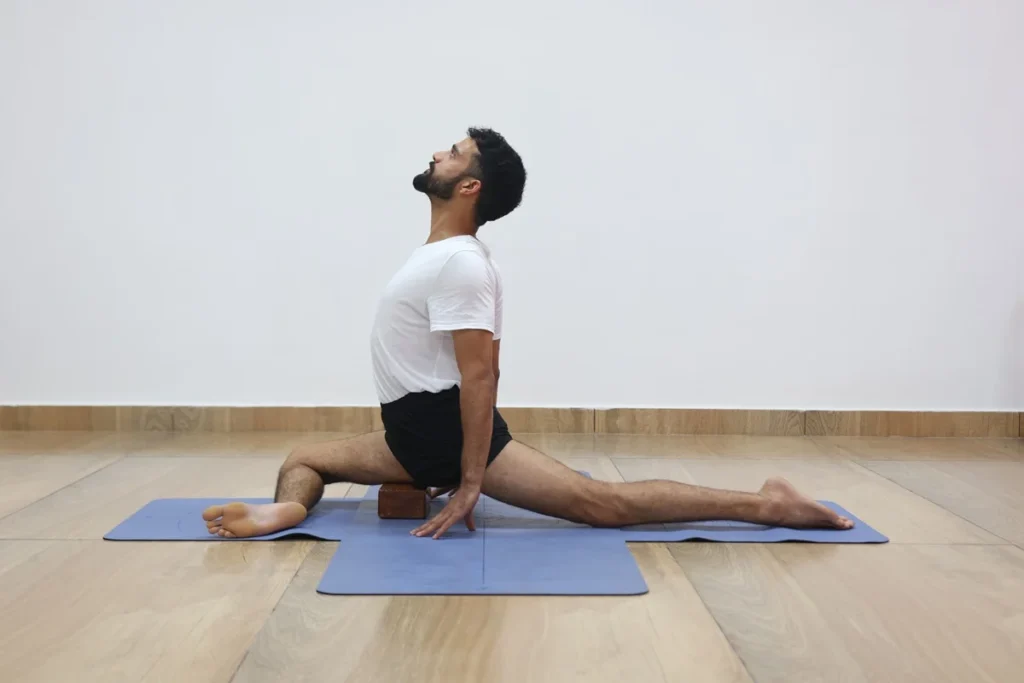
Option 1: Block or blanket under the front hip. Place a yoga block or firm folded blanket under the front hip if it helps support your pelvis. Start at a comfortable height and adjust it so you are not hanging on one side. The right height is different for every person.
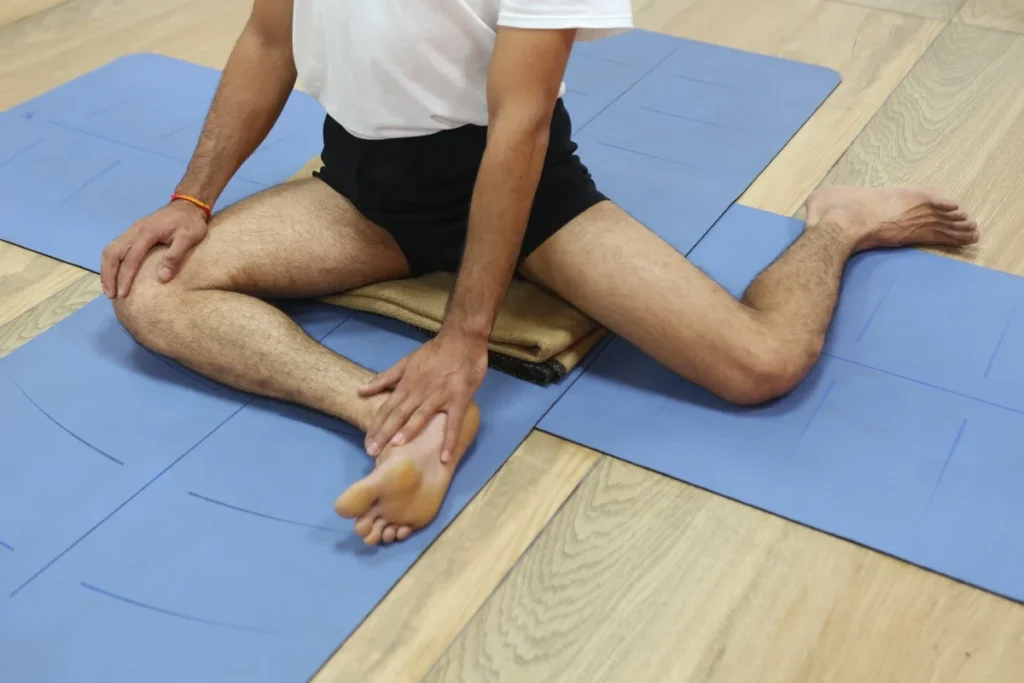
Option 2: 90-90 seated position (also called deer pose). Sit with one leg in front and the other to the side, both knees comfortably bent. Use a folded blanket under the hips if needed. Keep the range small and leave the position if either knee feels strained. This can be an alternative for some people, but it is not automatically suitable for everyone.
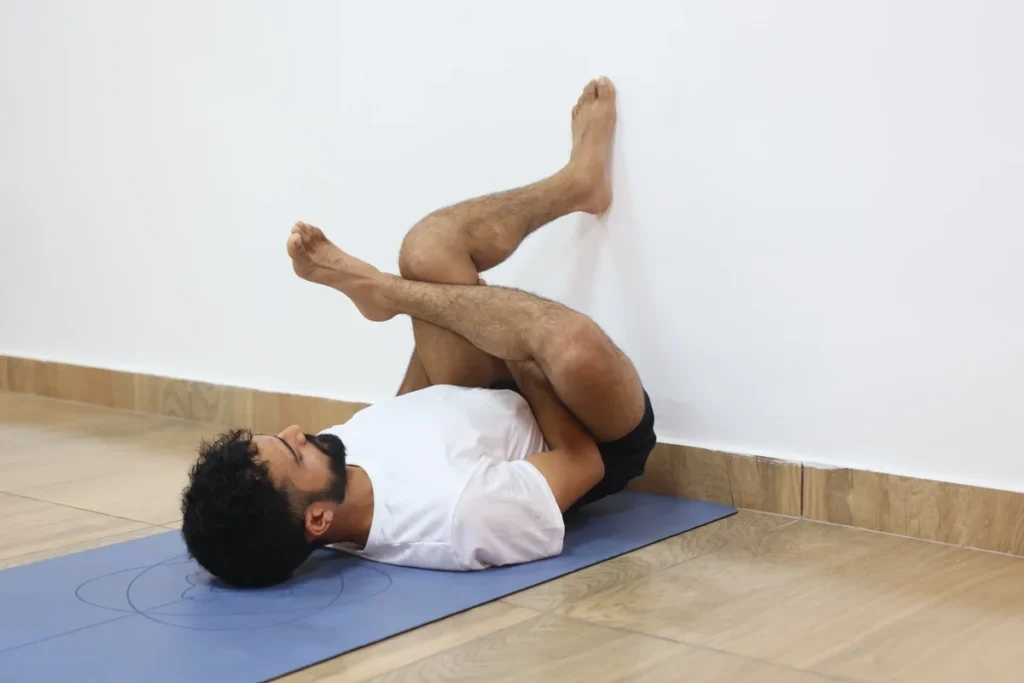
Option 3: Wall-supported figure-four. Lie on your back with your feet on a wall. Cross one ankle over the opposite thigh and gently draw the legs toward you, or keep the feet on the wall if that is more comfortable. The wall provides support, but the position still places some load through the hip and knee; stop if it causes discomfort.
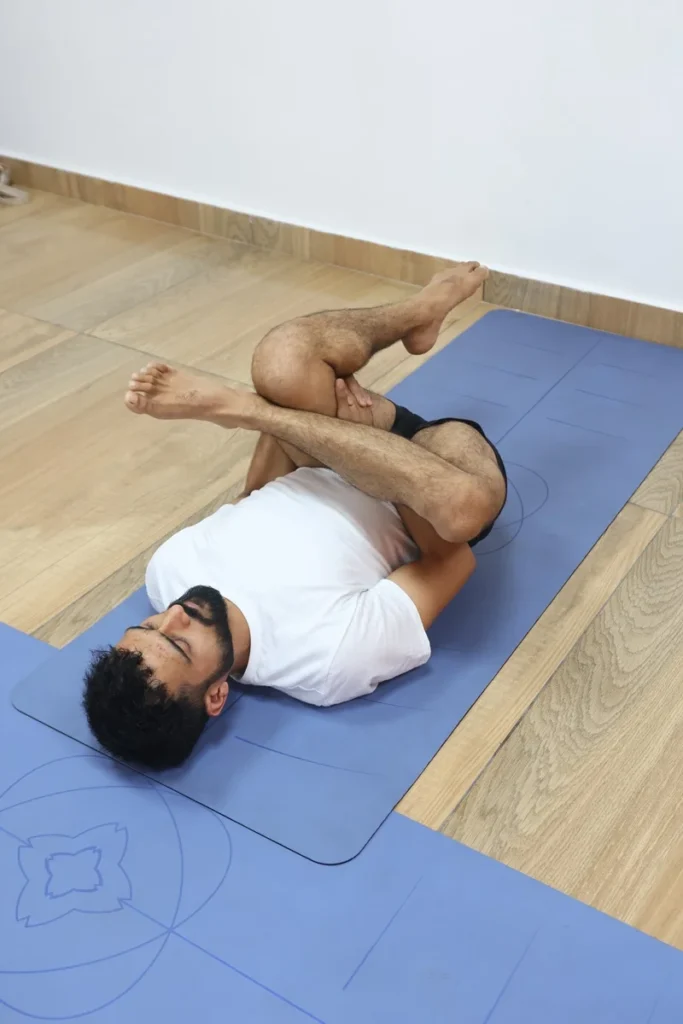
Option 4: Reclined figure-four. Lie on your back, cross one ankle over the opposite thigh, and draw the legs toward you only as far as comfortable. This may be easier to adjust than floor-based pigeon, but it is not automatically appropriate for every knee or hip condition.
Choose a version that feels comfortable and does not produce knee, hip, or back pain. If no version feels comfortable, leave Pigeon Pose out and ask a qualified professional for an alternative.
What mistakes cause the most pain in Pigeon Pose?
Discomfort in Pigeon Pose may be linked to several habits: letting one hip remain unsupported, forcing the shin parallel, folding before the position feels stable, or holding the pose longer than is comfortable. These are possibilities to review, not a guarantee that one of them is the cause.
- Letting the front hip remain unsupported. If one side of the pelvis is hanging, the position may feel uneven. Fix: try a block or blanket for support, if comfortable.
- Forcing the shin parallel to the mat’s edge. This asks for substantial hip rotation and may not suit your range. Fix: allow the shin to sit at a comfortable angle or choose another variation.
- A relaxed or pointed front foot. Some practitioners prefer a gently active foot, but foot position alone cannot prevent knee pain. Fix: choose a comfortable foot position and stop if the knee feels strained.
- Folding forward too early. Folding may increase the intensity of the position. Fix: remain upright with your hands supported until the pose feels comfortable.
- Holding too long or sinking deeper. A long hold is not necessary if the position is uncomfortable. Fix: use a shorter hold or choose another pose.
Also check the back leg. If the back knee feels uncomfortable, add padding or choose a different variation. If your lower back feels compressed, shorten the stance or leave the pose.
What is a simple five-point check I can use every time?
Use this check before you settle in. If any point feels uncomfortable, adjust or choose another variation.
- Foot: Choose a comfortable position for the front foot; do not rely on foot flexing as a guarantee of knee protection.
- Knee: The front knee feels comfortable, without pinching, pulling, or twisting.
- Hips: Support the pelvis if one side feels unsupported. Do not force both hip points to face a particular direction.
- Back leg: Use padding under the back knee if needed, and keep the lower back comfortable rather than forcing it into a particular shape.
- Breath: Breathe comfortably. If your breath becomes strained, ease out of the position.
Take a photo or record a short video of yourself from the front and side, once in a while. It is often easier to see a floating hip on screen than to feel it.
Who should skip Pigeon Pose or talk to a doctor first?
If you have a recent knee injury, hip replacement, known meniscus injury, or active SI-region or sciatic symptoms, ask your doctor or physical therapist before trying Pigeon Pose. Do not assume that reclined pigeon or figure-four is safe for your particular condition; ask which movements are appropriate for you.
Stop and seek medical advice if you notice any of these:
- Sharp pain that does not fade within a few minutes after you leave the pose
- A popping or catching feeling inside the knee, followed by swelling
- Pain, numbness, or tingling that travels down the leg
- Pain in the pelvis or low back that gets worse over several days
Pregnancy also changes how the pelvis and its joints respond to stretching, so a teacher who knows prenatal practice should guide any hip work during that time.
Can I fix my Pigeon Pose at home without a teacher?
You can make a lot of progress at home with the props and checks above, but it is hard to see your own hips and pelvis while you are in the pose. A floating hip or a twisted shin often feels normal from the inside.
That is why many students find it useful to have a trained teacher watch them on camera and give live feedback on prop height and leg angle. If you want that kind of guidance, you can try a live online class with Ganga Yogshala where teachers can see your setup and suggest changes for your body.
Pigeon Pose is not a test of how far your shin can reach. It is one possible hip stretch, and it is not suitable for everyone. Choose a supported variation only if it feels comfortable. If you feel pain around the knee, hip, or pelvis, change the setup or leave the pose rather than trying to tolerate the pain.