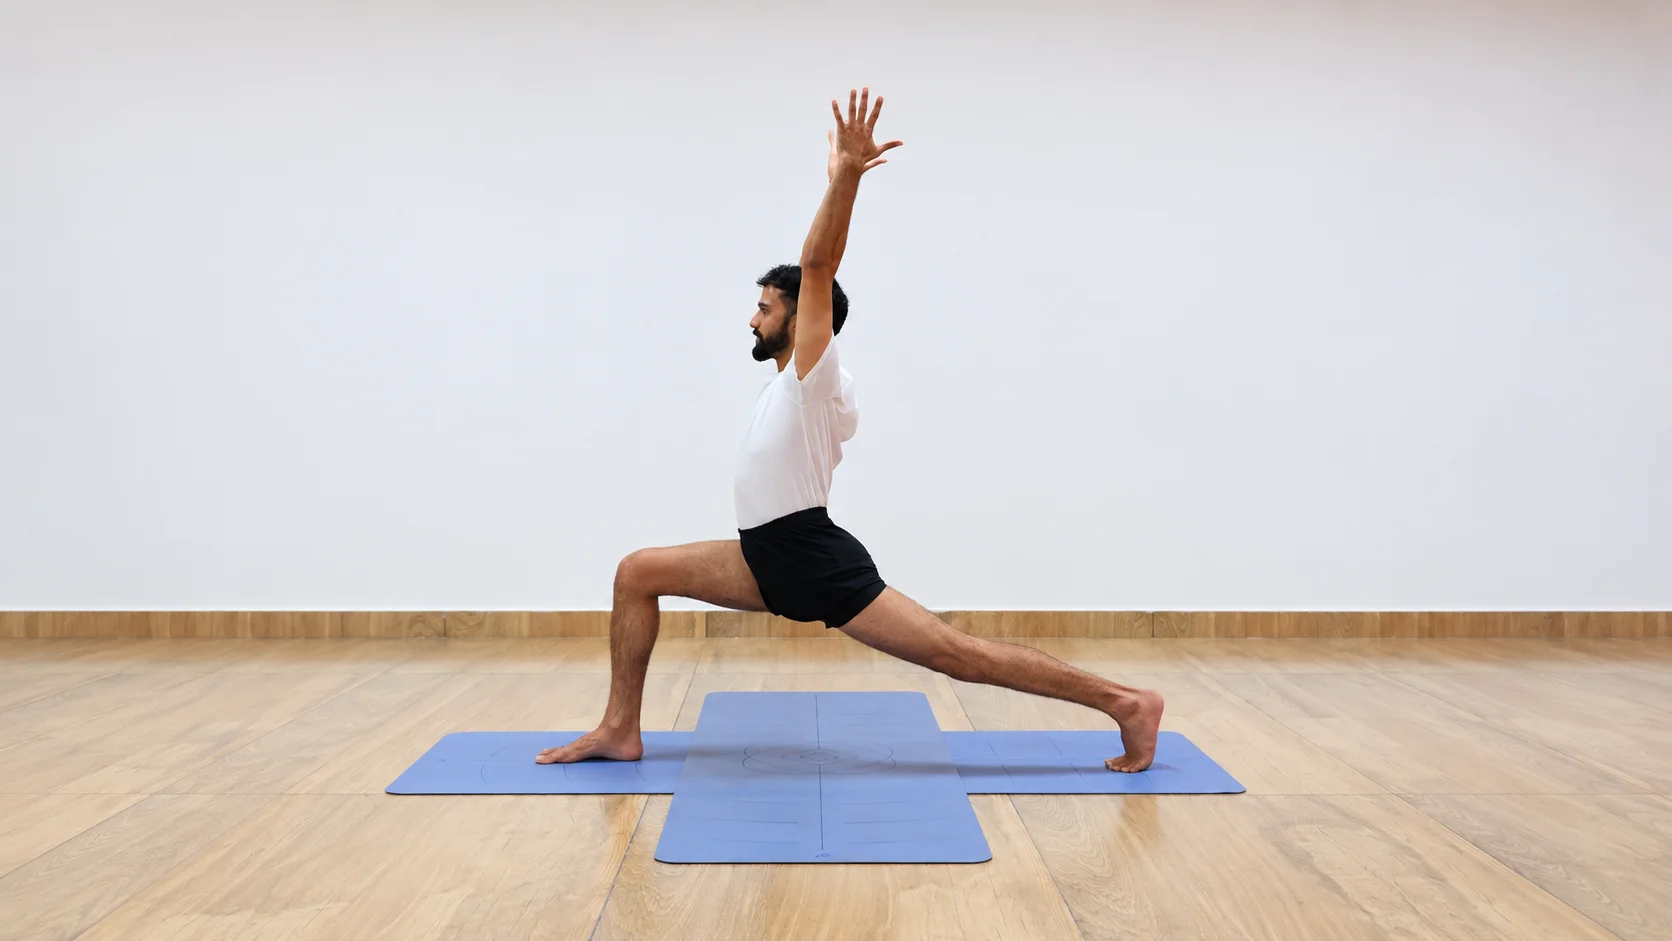
Warrior 1 hip alignment is one of the most confusing parts of a yoga class. Your teacher says “square your hips,” you try, and then your back knee or ankle starts to complain. Maybe your front hip swings forward, your lower back arches, or your back foot rolls onto its outer edge. This is very common, and it rarely means your body is “too stiff.”
In Warrior 1 (Virabhadrasana I), your hips should face forward as far as your joints allow, and no further. The turn should come from the hip joint, not from the back knee. If you feel any twist in the knee, the pose is telling you to change your stance, your foot angle, or your props. The sections below show you how, step by step.
How Should You Warm Up Before Warrior 1?
Spend two to three minutes warming up your ankles, hips, and spine before you enter the pose. Warrior 1 asks the back hip to open and the back foot to carry a lot of weight at an angle. If those joints are cold, it is easy to let the knee take the twist. A short warm-up lets them move first, before they have to hold.
Try these three drills:
- Ankle circles and calf stretch. Circle each ankle five times in each direction. Then press your back heel down in a short lunge for five slow breaths.
- Low lunge with hands on blocks. Place your hands on two blocks, lower your back knee to the mat, and let the front of the back hip stretch. Stay for five breaths, then switch sides.
- Cat-cow and shoulder rolls. Move your spine gently for six to eight rounds. Then roll your shoulders and tilt your head from side to side to ease your neck.
Next, set your stance. Stand with your feet about hip-width apart, as if you were on two train tracks rather than a tightrope. Step one foot back about three to four feet and turn the back foot out roughly 30 to 45 degrees as a starting point. Bend the front knee in a comfortable range, keeping it generally in line with the foot. If your hips feel tight or your back knee feels twisted, shorten or widen the stance and adjust the back-foot angle.
How Do You Build Warrior 1 From the Ground Up?
Build the pose from your feet upward: feet, knees, hips, spine, shoulders, and then neck. Each joint sits on top of the one below it, so a small error in the back foot shows up later as a problem in the knee or hip. Going in this order keeps every fix simple.
Feet. Press the front foot down evenly through the big toe side, the little toe side, and the heel. On the back foot, press the outer edge of the heel down and keep the inner arch lifted. If your arch collapses and the foot rolls inward, your stance is too long or your hips are turned too far.
Knees. Bend the front knee within a comfortable range and keep it generally tracking in the same direction as the middle toes. It does not have to stay directly above the ankle. Keep the back leg active without forcing the knee backward. Your stance and foot angle should allow both knees to feel comfortable. No single alignment check guarantees knee safety.
Hips. This is the heart of Warrior 1 hip alignment. Put your hands on your hip bones, the two bony points at the front of your pelvis. Gently guide the front hip back and the back hip forward only as far as your hips allow comfortably. Stop if you feel twisting at the back knee or pinching at the front of the hip. You are not aiming for perfectly square hips at any cost. Your pelvis may remain slightly open toward the back leg, and that is fine. In Warrior 2, the hips open sideways, which is a different action. Our guide to Warrior 2 (Virabhadrasana II) covers that pose.
Spine. Let your tailbone feel heavy, lift your breastbone, and grow tall through the top of your head. Keep your ribs soft so the bend comes from the upper back and not the lower back.
Shoulders and Neck. Lift your arms overhead, about shoulder-width apart, and let your shoulder blades slide down your back. Keep your neck long. Look forward, and only look up if your neck feels easy.
Breath is part of the build too. Breathe in as you lift your arms and breathe out as you sink a little deeper into the front knee. If your breath becomes short or you start to hold it, your muscles are working harder than they need to. Ease the pose by a small amount until the breath is smooth again.
Why Does Warrior 1 Burn So Much?
The burn comes from large muscles holding long positions at the same time. Your front thigh works hard to hold your weight, your back hip stretches, your buttock muscles steady the pelvis, and your shoulders hold your arms up. Several big areas get tired together, so the pose feels harder than it looks.
Here is what is working. As you bend the front knee, the front thigh muscle (the quadriceps) gets longer while it is still working to control the lowering. This kind of effort tires a muscle quickly. The muscles on the side and back of the front hip stop the knee from falling inward. On the back leg, the front of the thigh and the hip flexors are stretched, while the calf and foot muscles work to keep the heel and arch steady. Your belly and back muscles keep the body tall, and your shoulder and upper back muscles hold the arms overhead.
It helps to know the difference between two kinds of sensation. A broad, warm burn in the middle of a muscle that fades once you step out is normal. A sharp, pinching, or twisting feeling in a joint is not. That joint might be the knee, the ankle, the crease of the hip, or the lower back. Treat the second kind as a signal to adjust your pose or come out.
Which Props Help You Square Your Hips Safely?
A wedge or block under the back heel, a wider and shorter stance, and a strap for the arms are the three most useful supports. They let your hips face forward without making the back knee twist. Props are not a sign of weakness. They help your bones stack in a safe line while your muscles learn the shape.
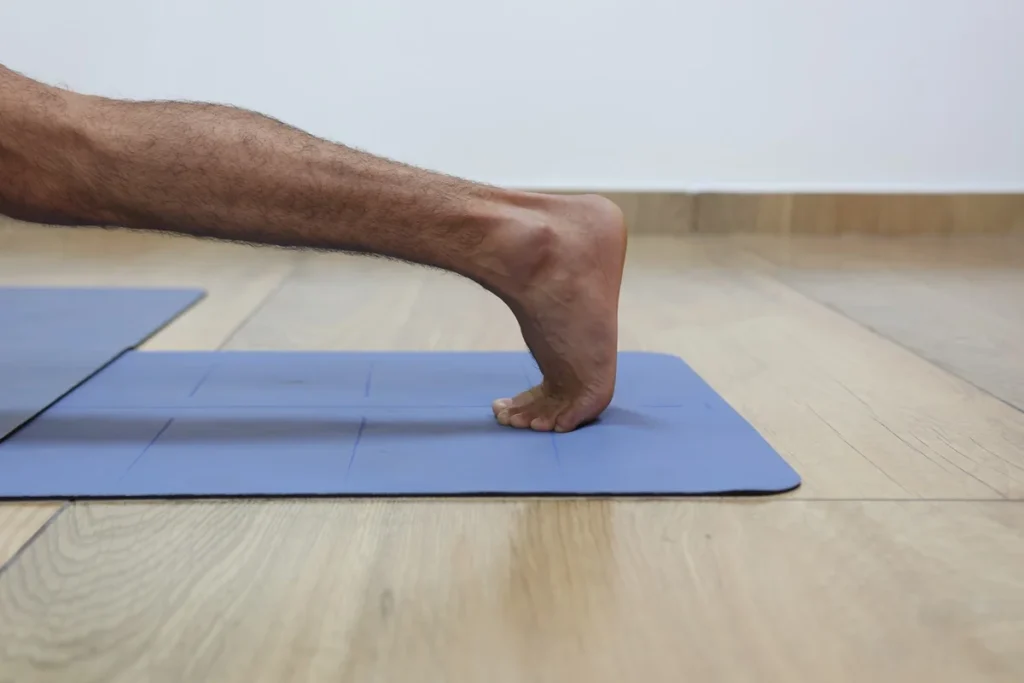
Option 1: Lift the back heel. Place a wedge, a folded blanket, or a block under the back heel and keep the ball of the foot on the floor. With the heel raised, the back leg is not locked into a turned-out position, so the hips can swing forward more easily. The pose becomes close to a high lunge. This is a good choice if your back ankle or knee complains when the heel is flat on the floor.
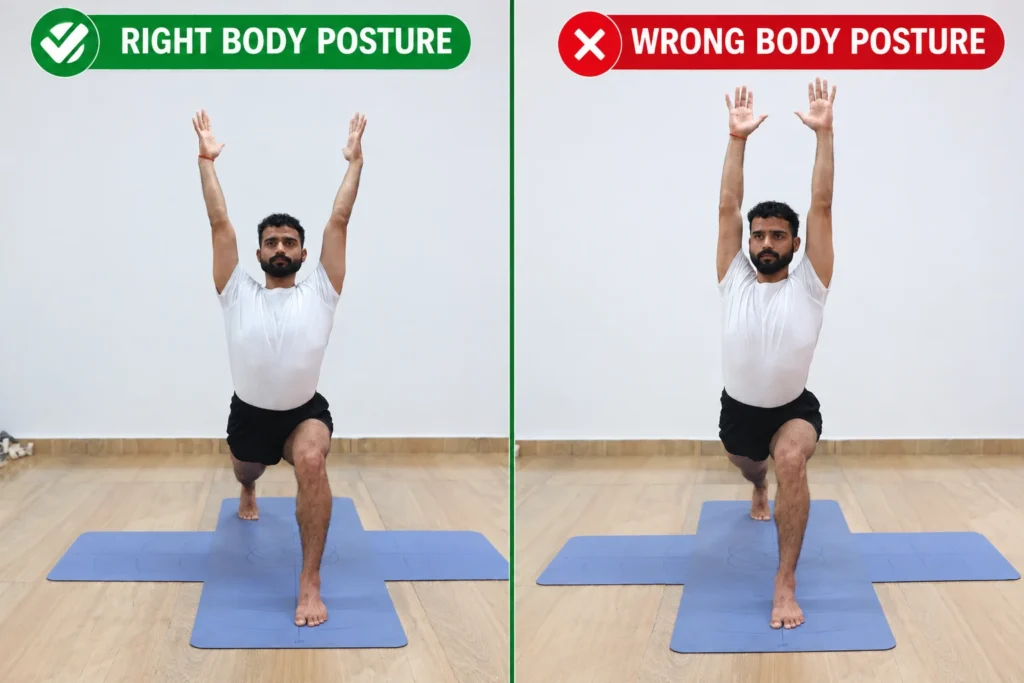
Option 2: Widen the stance. Place your feet hip-width apart from side to side, rather than on one narrow line. This may give your pelvis more room to adjust. Pair it with a front-to-back stance length that feels stable. Avoid forcing the back hip forward or arching the lower back to make the hips look square.
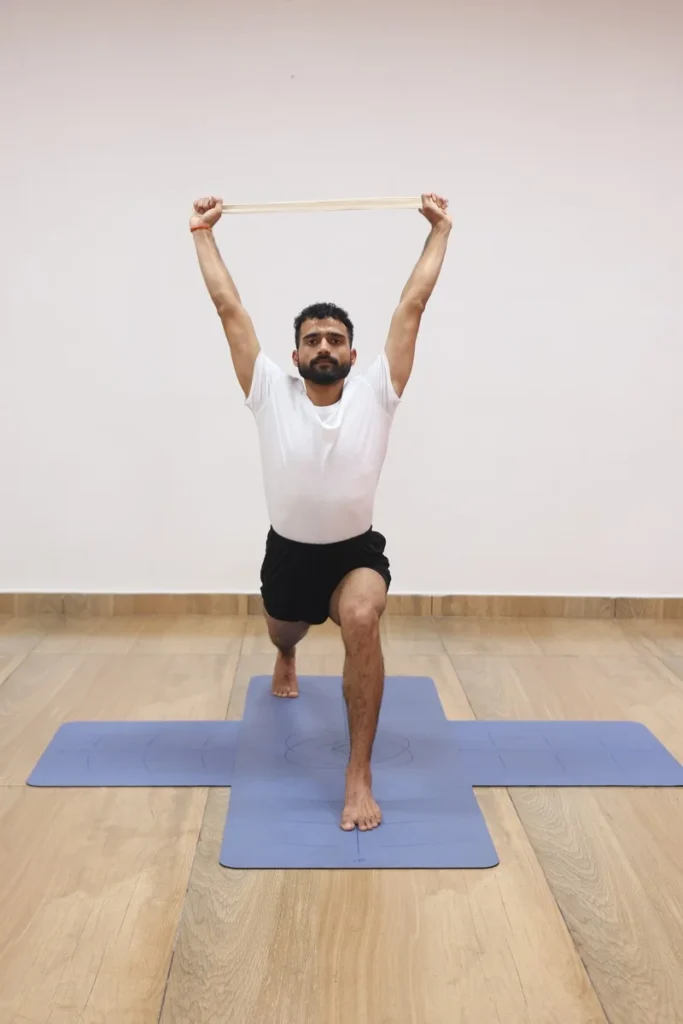
Option 3: Use a strap overhead. Hold a strap with your hands shoulder-width apart and lift your arms. The strap stops your arms from drifting wide and helps you open the sides of your upper body without arching your lower back. If balance is hard, rest one hand on the back of a chair or on a wall instead.
You do not need all three at once. Start with the one that fixes your biggest problem. If the back knee twists, start with the heel. If the lower back pinches, start with the stance. If the arms and shoulders feel tight, start with the strap.
What Mistakes Hurt the Back Knee in Warrior 1?
A common mistake is forcing both hips forward while the back foot stays flat and fixed. If the hip cannot rotate comfortably, some of that rotation may be transferred to the knee. Adjust the stance, foot angle, or use support rather than forcing the pelvis forward. Discomfort can have several causes, so persistent pain should be assessed rather than assumed to come from one alignment error.
Watch for these five habits:
- Forcing the hips to be perfectly square. Stop at the point where the back knee feels neutral and calm.
- A collapsed back arch. If the inner edge of the back foot sinks, the knee rolls with it. Press the outer heel down and lift the arch.
- A stance that is too long. The front hip then pinches and the lower back arches to make up for it. Shorten the stance.
- The front knee drifting inward or moving beyond the ankle is not automatically a sign of injury. Aim to keep the knee tracking in the same general direction as the toes, and bend only as far as you can control comfortably.
- Flared ribs and a dropped head. Pushing the ribs forward and tipping the head back squeezes the lower back and the neck. Keep the ribs soft and the neck long.
Stop the pose if you feel sharp or worsening pain, instability, numbness, or tingling. Come out slowly and seek advice from a healthcare professional if symptoms persist, recur, or affect walking or daily activities.
What Is a Quick 5-Point Check for Warrior 1 Hip Alignment?
Check your feet, knees, hips, spine, and shoulders, in that order. It takes about ten seconds. If all five feel steady, you can hold the pose for five calm breaths. If one feels off, fix that one first and then check again.
- Feet: Back foot turned out 30 to 45 degrees (or heel on a wedge), whole foot pressing down, inner arch lifted.
- Knees: The front knee tracks in the same general direction as the middle toes. Let it move forward as needed for your body, without forcing a fixed ankle-to-knee position.
- Hips: Hips face forward as far as is comfortable. No twist felt in the back knee. Hip bones about level.
- Spine: Tailbone heavy, ribs soft, lower back long.
- Shoulders and Neck: Arms up, shoulders away from the ears, neck long, breath smooth.
Keep this list next to your mat. If you cannot breathe smoothly, the pose is too much for today. Shorten the stance, raise the heel, or bring the arms down, and try again tomorrow. Progress in this pose comes from many calm, honest repetitions, not from one deep one.
Also think about how often you practice. Holding Warrior 1 for five breaths on each side, two or three times a week, is plenty while you learn the shape. Short, careful rounds teach your hips more than one long, strained hold. Rest for a few breaths in a standing forward fold or in Mountain Pose between sides.
Why Is It Hard to Check Your Own Hips at Home?
You cannot see your back knee, your pelvis, or your lower back while you are inside the pose, so small errors go unnoticed. A mirror helps a little, and a video helps more, but neither one tells you what to change. That is why many home practitioners repeat the same twist for months without knowing it.
There are a few things you can do on your own. Film yourself from the front and from the side. Place your hands on your hip bones and see whether they point the same way. Check that your back kneecap and toes face the same way. Notice any pain that returns after practice, even a mild one.
If you would like a teacher to look at your pose, Ganga Yogshala runs live online classes where teachers watch your camera and give spoken adjustments on stance width, foot angle, and prop height. You can book a free live trial class and have your Warrior 1 hip alignment reviewed in real time.